Container cost allocation is one of the biggest challenges organizations face today. In this article, we’ll give practical guidance on understanding and optimizing your full AWS spend, with actionable steps you can take to:

  • Establish your baseline AWS spending
  • Get started implementing container cost allocation
  • Identify cloud waste

Plus, we’ll give you a sneak peek into nOps’s budgeting process as a real-world practical example. See how we worked across our organization to establish budgets with the finance team and product team and utilized this data to attack container waste.

This article is based on the below webinar

Why is Kubernetes cost allocation so difficult?

Containers share Kubernetes compute resources. You often have multiple workloads running on the same node out of many nodes in your Kubernetes cluster. Each container will request and use some amount of memory and CPU for each node for a period of time (making resources ephemeral and hard to track).

Adding to the difficulty, you must reconcile Kubernetes data with AWS Cost and Usage data to accurately calculate container costs. This requires aligning granular data on the container’s usage of ephemeral resources (perhaps tracked by a third-party tool like Kubecost) with your AWS CUR data, which is not a straightforward process.

Finally, most tools are not integrated with your AWS cost management.  Even if you can allocate costs, putting that allocation in the context of your entire AWS bill is another challenge.

To help your product and finance teams understand their actual cloud expenditure and drive accountability, you need comprehensive report to map your full costs back to features, products, teams or other cost centers. 

Let’s discuss the steps needed to accomplish this.

Step 1: Getting an accurate baseline of your AWS spend

A consistent tagging system is important to getting visibility into your spend. You can use Infrastructure as Code (IaC) to automate the tagging process for all of the resources you create. You can also use different AWS accounts in your organization to separate between different environments, departments, or other cost centers.

But keep in mind, tagging isn’t enough

There are a lot of AWS costs that can’t be tagged, making them very difficult to track, even with a very robust tagging strategy — like containers, or marketplace purchases. That’s why it’s important to attack the problem with multiple approaches and think beyond allocating with tags alone.

One way you can do this is through nOps Business Contexts+ — let’s go through an example.

Watch “Step 1: Getting an accurate baseline” explained by nOps Senior Engineer André Leite

  1. Create showbacks using cost allocation keys: Start by setting up a showback to describe the costs you want to allocate. You can create showbacks by tags or even cost allocation tag keys.Showbacks cost allocation
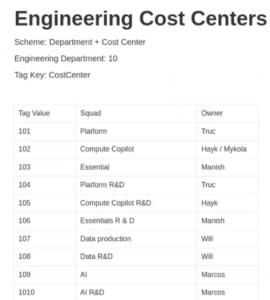
  2. Everyone needs to know which keys match to which cost centers.  For example, for our Cost Centers we use tags. Tag value ‘101’ represents the platform team, with ‘Truc’ as the owner — all squads should tag their workloads accordingly.Engineering Cost Centers
  3. Allocate AWS Marketplace costs: You can create new showback values specifically for difficult-to-allocate costs. For instance, establish a showback called “marketplace” to manage unallocated marketplace expenses.

    For specific vendors, you can use filters in the nOps platform to segregate these costs and allocate them to the designated showback. For example, since cost center ‘107’ (i.e. the nOps Data team) is responsible for data-related expenses, we can assign Databricks costs to them

    Engineering Cost Centers
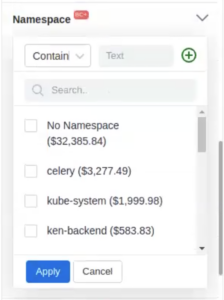
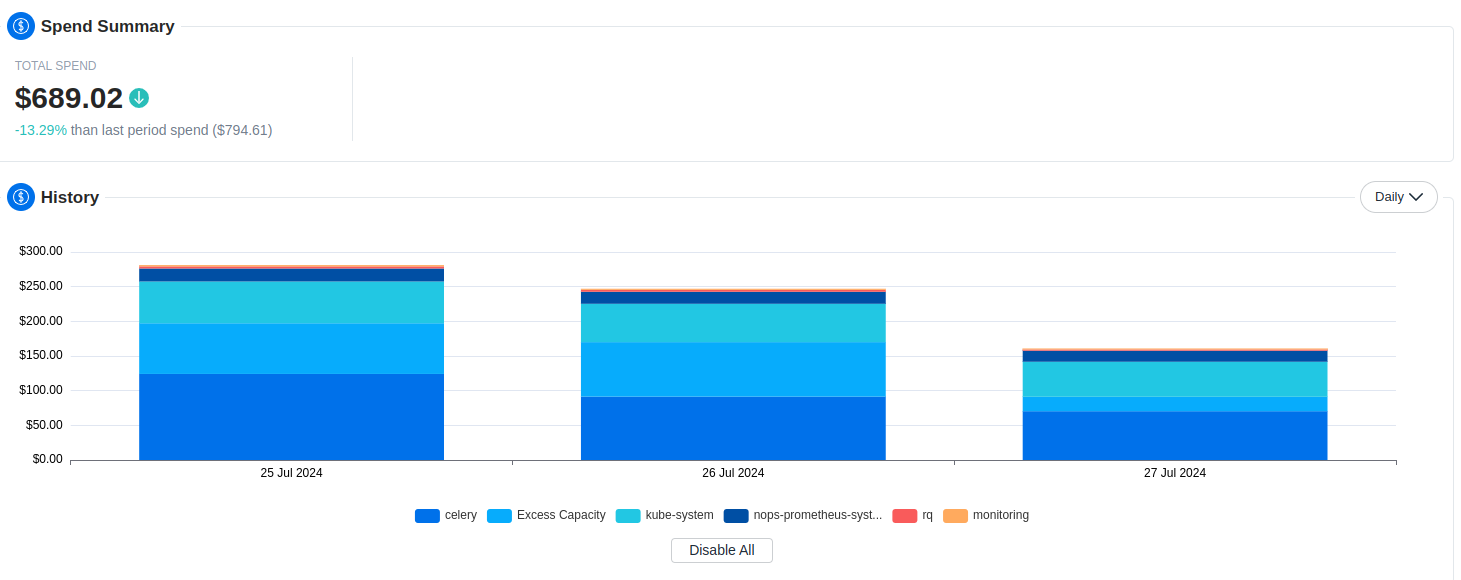
  4. Allocate costs by namespaces & labels: You can apply namespaces to filter and list costs associated with containerized resources. The nOps platform automatically pulls the labels from inside your Kubernetes workloads. For example, the ‘celery’ namespace is used by the platform team, so we’ll allocate those costs to them.You can use this even if you don’t already have tags in place — You could use your labels as cost allocation tag keys from your workloads, so if you have the CostCenter label in your workloads, you would be able to accomplish the same. It’s a really powerful automation feature for allocating your costs!

    Namespace

    Using nOps Business Contexts+, you can slice and dice your costs by any Kubernetes concept — cluster ARN, node, pod, namespace, deployment container. 

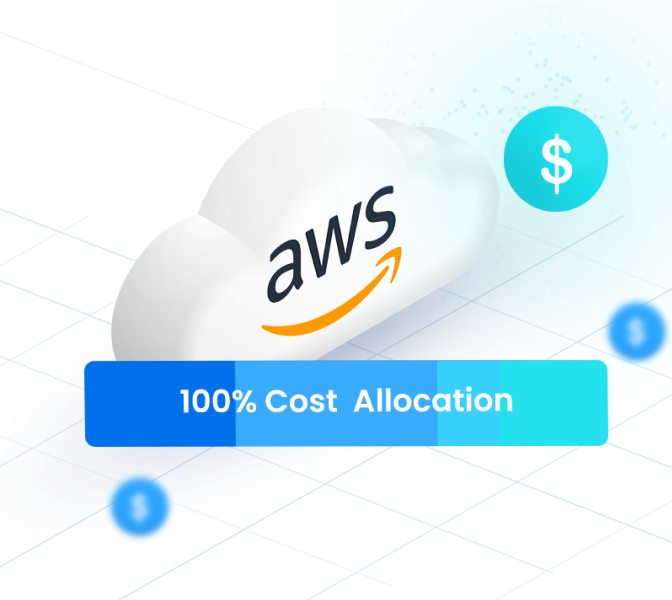
  5. Watch the number of your unallocated costs shrink to 0%. Once you’ve completed this exercise, you should be able to allocate 100% of your AWS costs, including all container costs!
Related Content

Unlocking Container Cost Allocation: The Essential Guide

Allocate 100% of your EKS spend down to the container level

Step Two: Establishing and tracking a budget

Once you’ve established a baseline, the next step is establishing a budget and then building a culture around tracking that budget. We’ll talk a little bit about the process that we went through at nOps to build maturity in this area.

Watch “Step 2: Establishing and tracking a budget” explained by nOps VP of Engineering James Wilson

  1. Aligning Engineering with Finance
  2. One of the key challenges we faced was ensuring that both the product and finance teams were aligned on how we allocate and track costs. To achieve this, we worked closely with our CFO, to establish clear reporting requirements that would satisfy all stakeholders. He played a crucial role in defining the reporting needs from a financial perspective.

  3. Delineating between Platform vs Product expenses
  4. A significant part of our alignment process involved distinguishing between expenses related to platform development and those tied directly to our product offerings. R&D expenses, for instance, encompass the costs associated with testing and developing in lower environments, while COGS is focused on the expenses tied to delivering our products and services to customers.

  5. Matching allocation categories to the budget
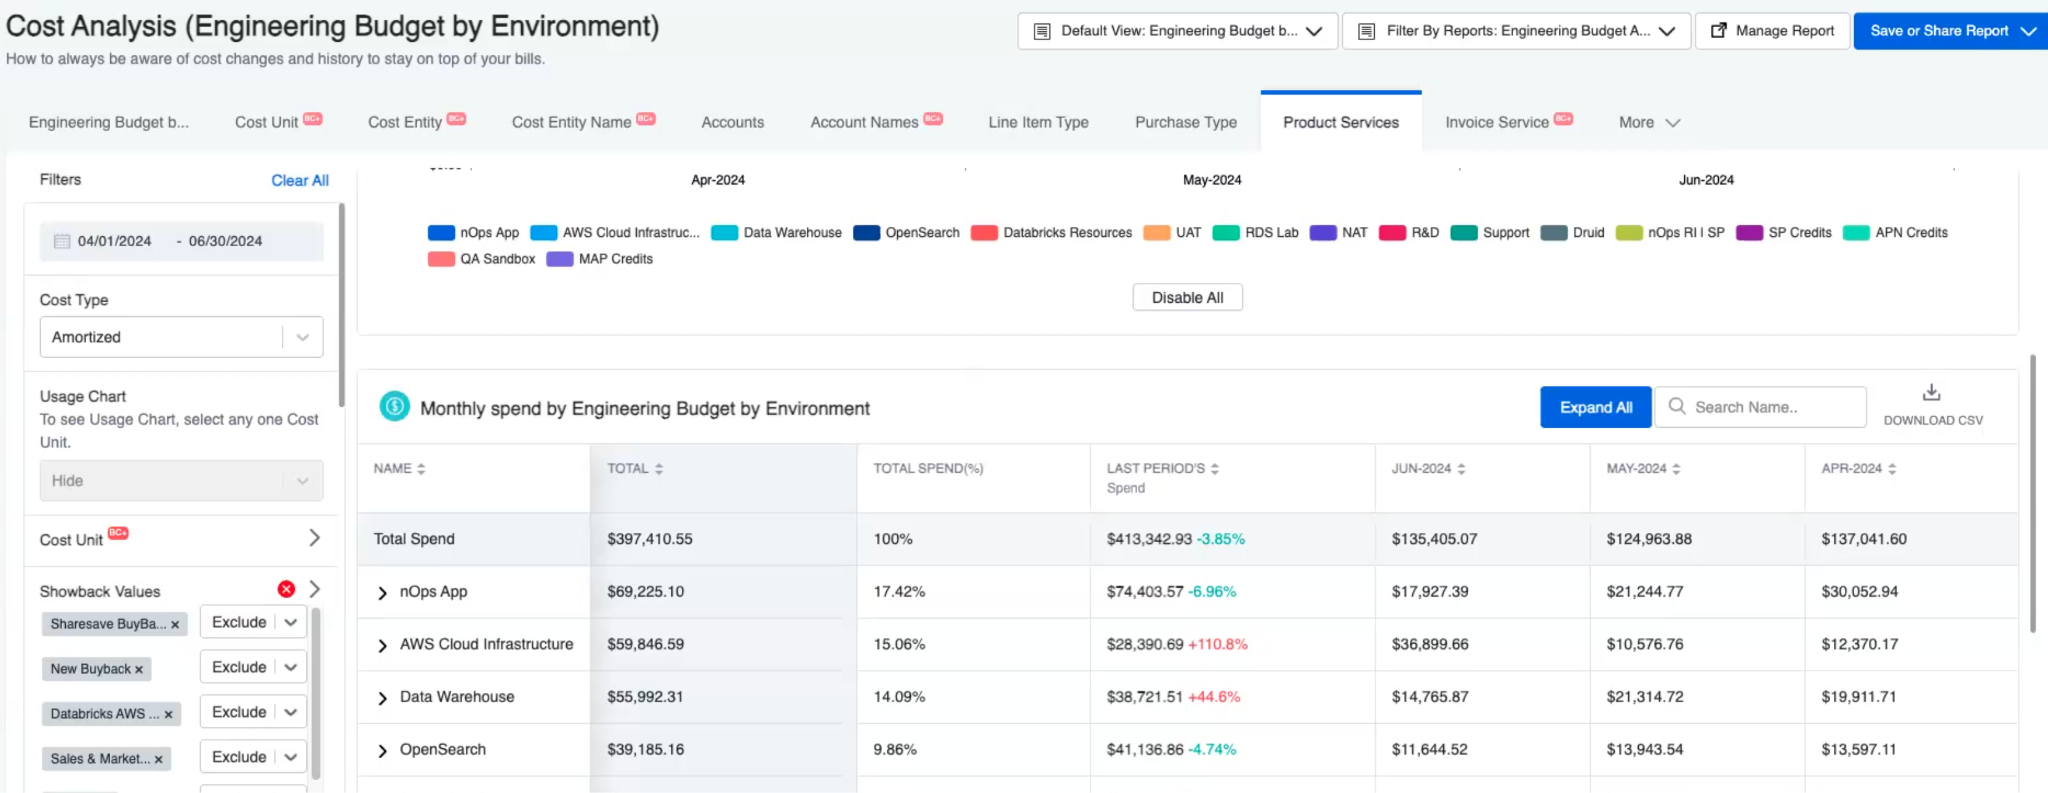
  6. After defining these categories, we built showbacks that mirrored the budget allocations provided by our finance team. These showbacks were meticulously mapped to the budget categories we established, ensuring that every dollar spent was properly categorized. Through collaborative working sessions, we fine-tuned these allocations, making sure that all parties were satisfied with how expenses were distributed across R&D, production environments, and other critical categories.

    Cost Analysis
  7. How to roll it out to the team and build a culture of accountability
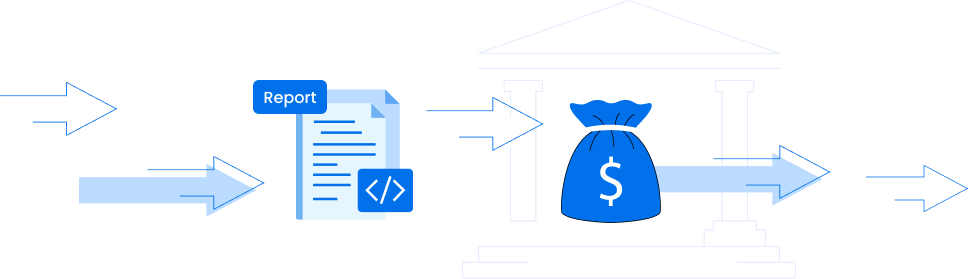
  8. We implemented an “engineering budget adherence report” that tracks spending across various categories on a weekly basis. This report is reviewed during our Friday all-hands meetings, where we discuss any discrepancies and strategize on how to attack them.

    Cost Analysis

    By making budget tracking a regular part of our discussions, we were able to instill a sense of ownership and accountability. Each team now started to understand what their impact on the budget is, and how to track it at a squad and individual contributor level.

    And that leads us to the final piece: how to effectively identify cloud waste in shared environments.

Step 3: Identifying cloud waste

As discussed, container waste is a complex issue. Containers often over-request CPU and memory, leading to over-provisioning and wasted resources. In a Kubernetes environment, it’s common to see nodes running at a fraction of their potential, while still incurring full costs. Let’s discuss a few key points on identifying cloud waste.

Watch “Step 3: Identifying cloud waste” explained by nOps Senior Engineer André Leite

Be flexible when optimizing for price

When optimizing for price, it’s essential to remain flexible and consider a variety of pricing models. This includes evaluating whether you’re leveraging Spot Instances or AWS commitments like Reserved Instances and Savings Plans. You should also assess if your workloads are being scaled correctly, ensuring that your instances and containers are right-sized for their tasks. Additionally, implementing tools to schedule shutdowns when resources aren’t in use can lead to significant savings.

It’s vital to keep monitoring and optimizing regularly. For example, by analyzing reports that track namespace allocations, you can gain deeper insights into your cost structure. Initially, you might only see a total cost with no breakdown by workload or namespace. However, by using tools like the nOps Business Contexts+ agent in your EKS cluster, you can achieve finer granularity. This enables you to slice and dice your costs across deployments, nodes, and other Kubernetes constructs, making the optimization process much more powerful.

Monitor waste reduction progress

Tracking your progress in reducing waste is crucial to maintaining cost efficiency. At the start, you may find certain namespaces, like the ‘celery’ namespace used by the platform team, showing high excess capacity. This excess capacity indicates that resources are over-provisioned, with containers requesting more memory or CPU than they actually use.

After identifying this issue, we made several adjustments, including optimizing resource requests for the ‘celery’ workload and reconfiguring our node groups to use more efficient instances. These changes had a noticeable impact: excess capacity dropped from approximately 26% to around 13% within a few days. This reduction in excess capacity also led to a roughly 40% decrease in total costs.

Spend Summary

By regularly reviewing and refining our cost management strategies, you’re not only able to reduce waste but also achieve substantial cost savings. And with continued enhancements, including automatic container rightsizing recommendations with one-click apply from nOps (coming soon), the process of optimizing and monitoring will become even more streamlined and effective.

More about nOps Business Contexts+

nOps Business Contexts transforms millions of rows of contextless data into the who, what, when and why of cloud spend — making it easy to get 100% visibility of your cloud costs and usage.

  • Allocate 100% of your AWS costs, including EKS. Kubernetes costs are often a black box — no longer with nOps. Understand and allocate your unified AWS spend in one platform.
  • Automated resource tagging. You don’t need to have all your resources tagged to allocate costs. Create dynamic rules by region, tags, operation, accounts, and usage types to allocate costs back to custom cost centers.
  • 40+ views & filters. Map hourly costs by any relevant engineering concept (deployment, service, namespace, label, pod, container…) or finance concept (cost unit, purchase type, line item, cost allocation tag…).
  • Custom reports & dashboards for the whole team. Monthly reporting and reconciliation can take hours; with nOps only minutes. Tailor dashboards and Slack/email reports to your needs, whether you’re a CFO or VP of Engineering.

The best part? nOps is an all-in-one solution for all of your cloud optimization needs: automated commitment management, rightsizing, resource scheduling, workload management, Spot usage, storage optimization, and more.

Join our customers using nOps to understand your cloud costs and leverage automation with complete confidence by booking a demo today!