Skip to content

Navigating the complexities of AWS billing and cost analysis can often feel like a full-time job in itself. There are so many configuration options at your fingertips, and the default option isn’t always the most cost-effective.
Plus, with pricing tiers and policies continually being updated, it’s easy for additional costs to accumulate unnoticed.
At nOps we optimize $1.8 billion in cloud spend for our customers — and we know exactly where to look for those hidden costs. In this guide, we’ll reveal six common charges that might be quietly inflating your bill (plus how to find and eliminate them).
#1: Accidental Extended Support for EKS
If you’re not up to date on the latest Kubernetes version, it can cost you.
A new EKS version is under standard support in Amazon EKS for the first 14 months after it’s released. Once a version is past the end of standard support date, it automatically enters extended support for the next 12 months — which comes at an additional $0.60 per cluster hour. In practice, this can drive up your bill to 6x the cost.
It’s easy to update your EKS clusters to the latest Kubernetes version. And it’s even easier to figure out which clusters need updating with nOps Business Contexts.
Simply click on usage type and type in “extended” to see all the extended support charges you are paying, across all regions and services.
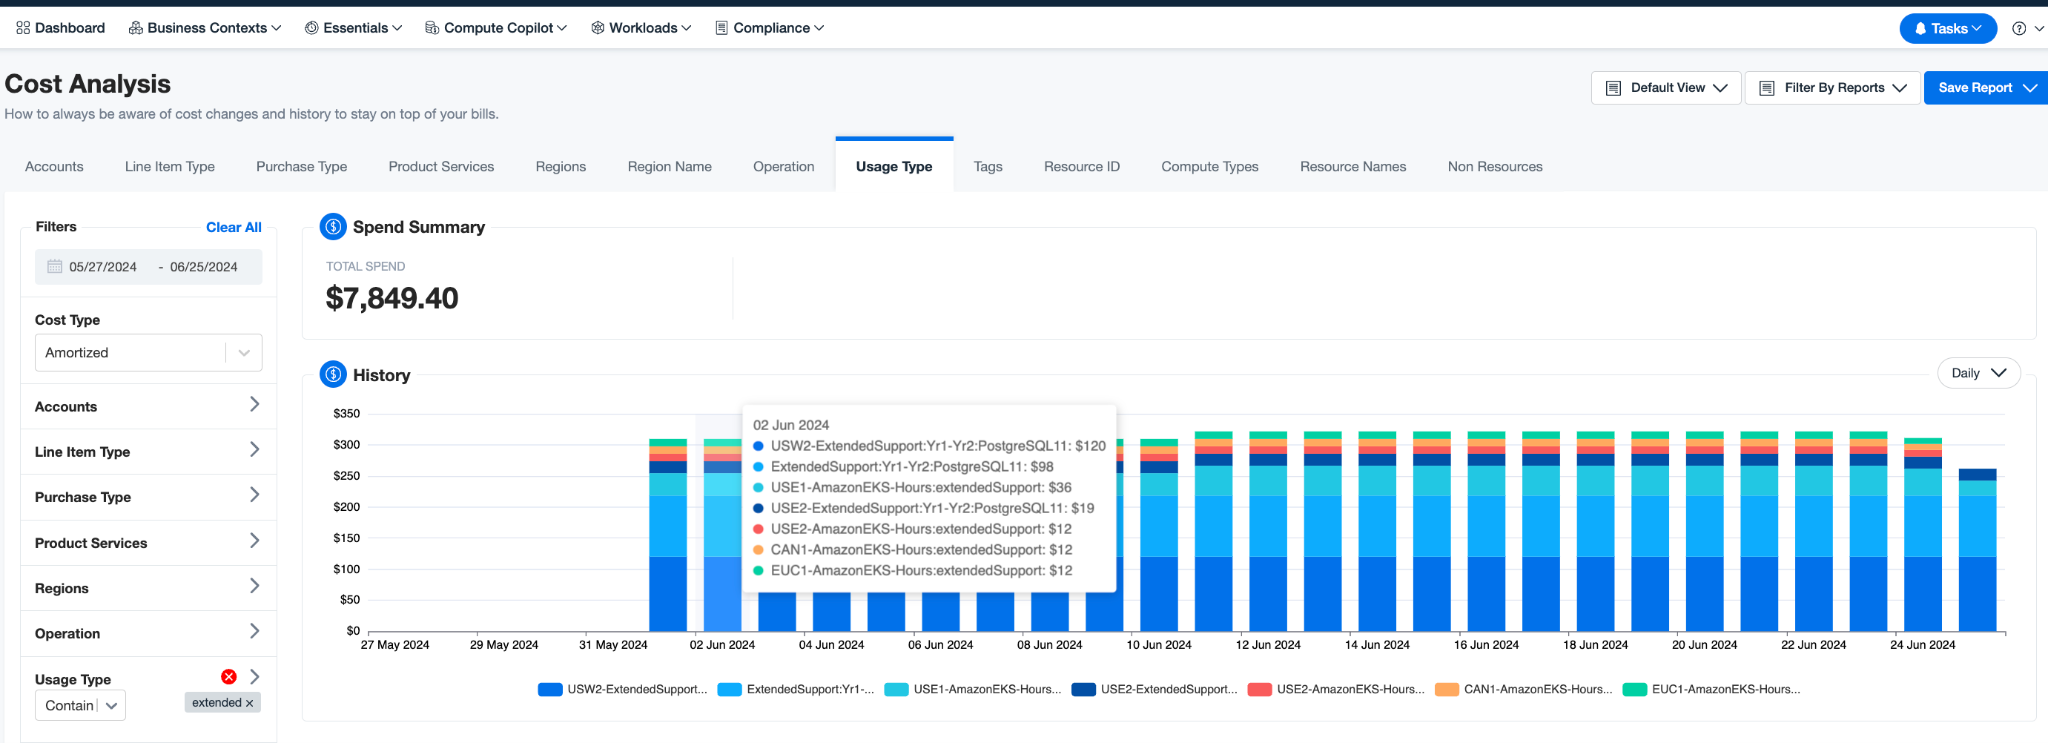

There’s no need to track down every individual charge; everything you need is all in one place. Click on any individual line item for additional granularity into the exact clusters causing the charges.
#2: Extended Support for RDS
Another common AWS billing pitfall: not updating RDS, leading to extended support charges.
Your databases are not automatically upgraded to the latest version; you will however be auto-enrolled into extended support. A simple configuration change can eliminate these costly charges.
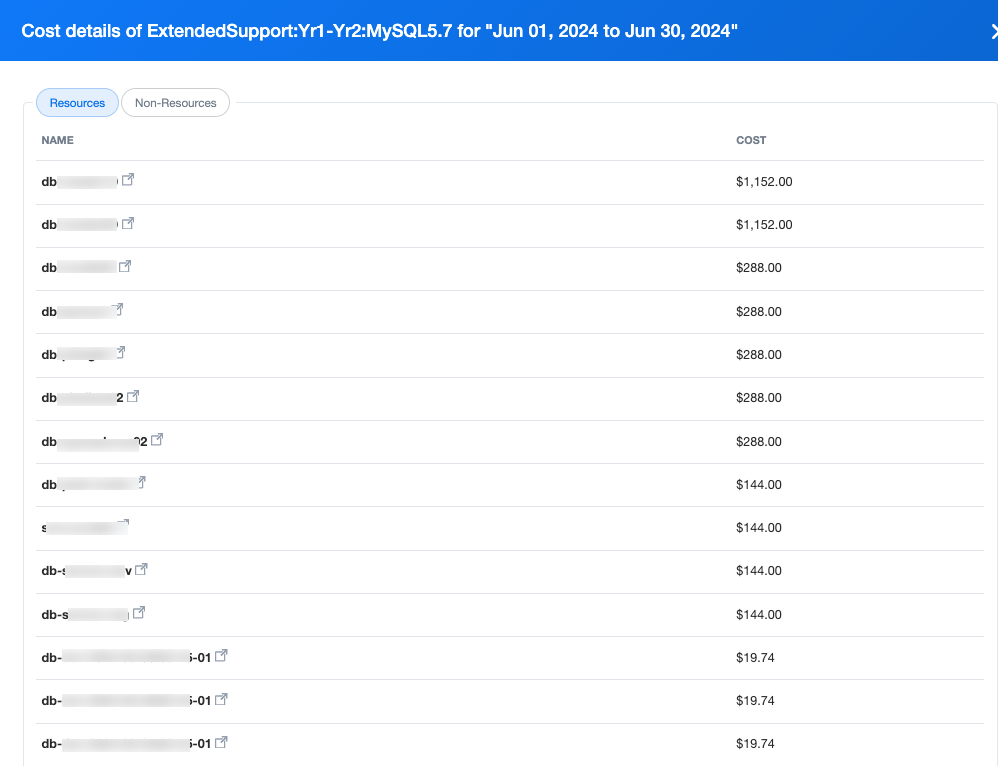
For provisioned instances on RDS for MySQL, RDS Extended Support is priced per vCPU per hour and depends on the AWS Region and calendar date.
nOps makes it trivially easy to find these costs — just type in “extended” and “RDS” into the filters and voilà!
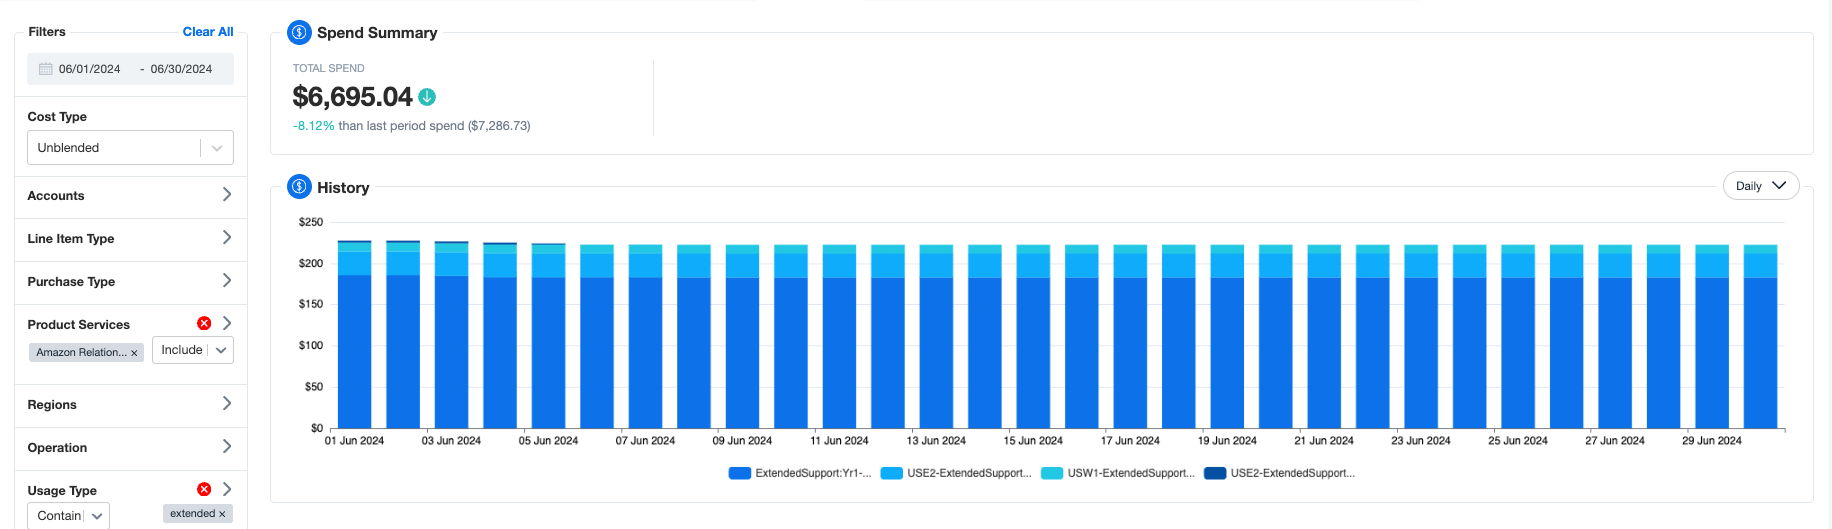
Right here you can see exactly how much you will save on RDS extended support and where to go to make the updates.
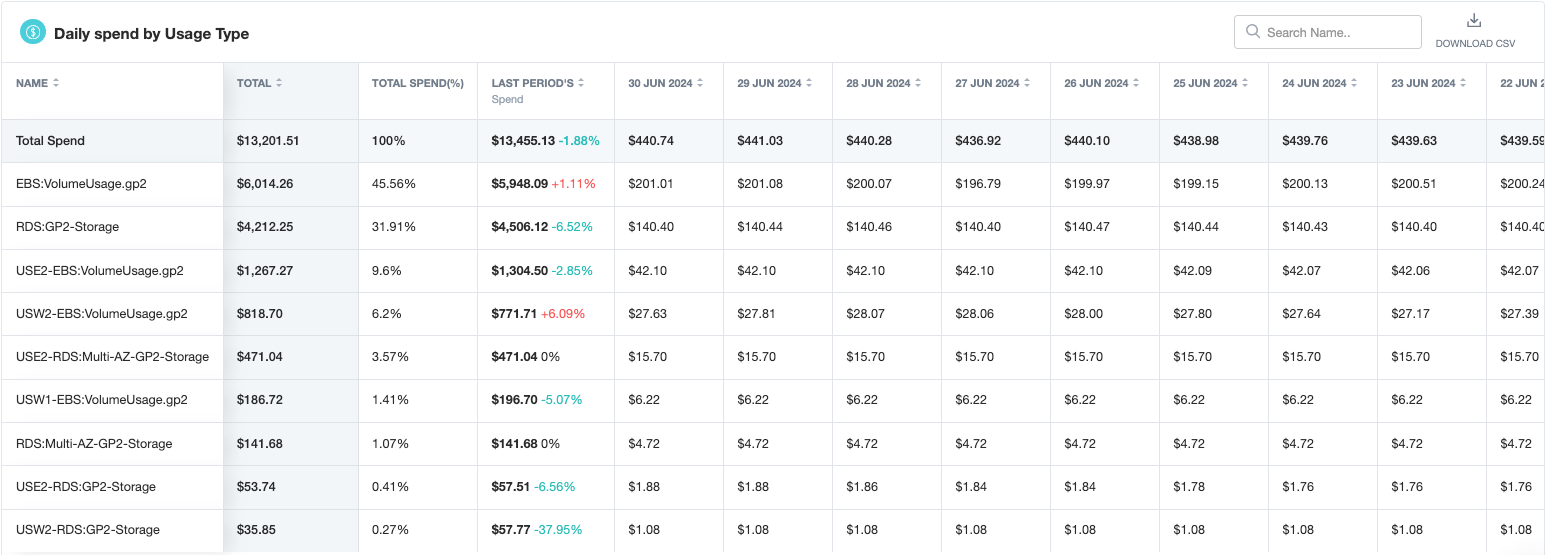
#3: Change io1 or gp2 volume type to gp3
Many think that io1 is the best choice for running your database. The assumption is that all databases need a high IOPS and potentially high throughput volume type. However, we find that in practice, the vast majority of people are better off with gp3 (and can save half the cost by switching).
The gp3 volume type provides a baseline performance of 3000 IOPS, and 125 MiB/s independent of volume size. With gp3 volumes, you can modify both the IOPS and the throughput capabilities of each volume to help match a given workload requirement. Specifics on proper ratios of volume size to IOPS to throughput can be found here.
If you’re currently using gp2 volumes, migrating to gp3 typically yields around 20% savings.
Again, it takes just seconds to filter out all relevant volumes through the nOps platform.
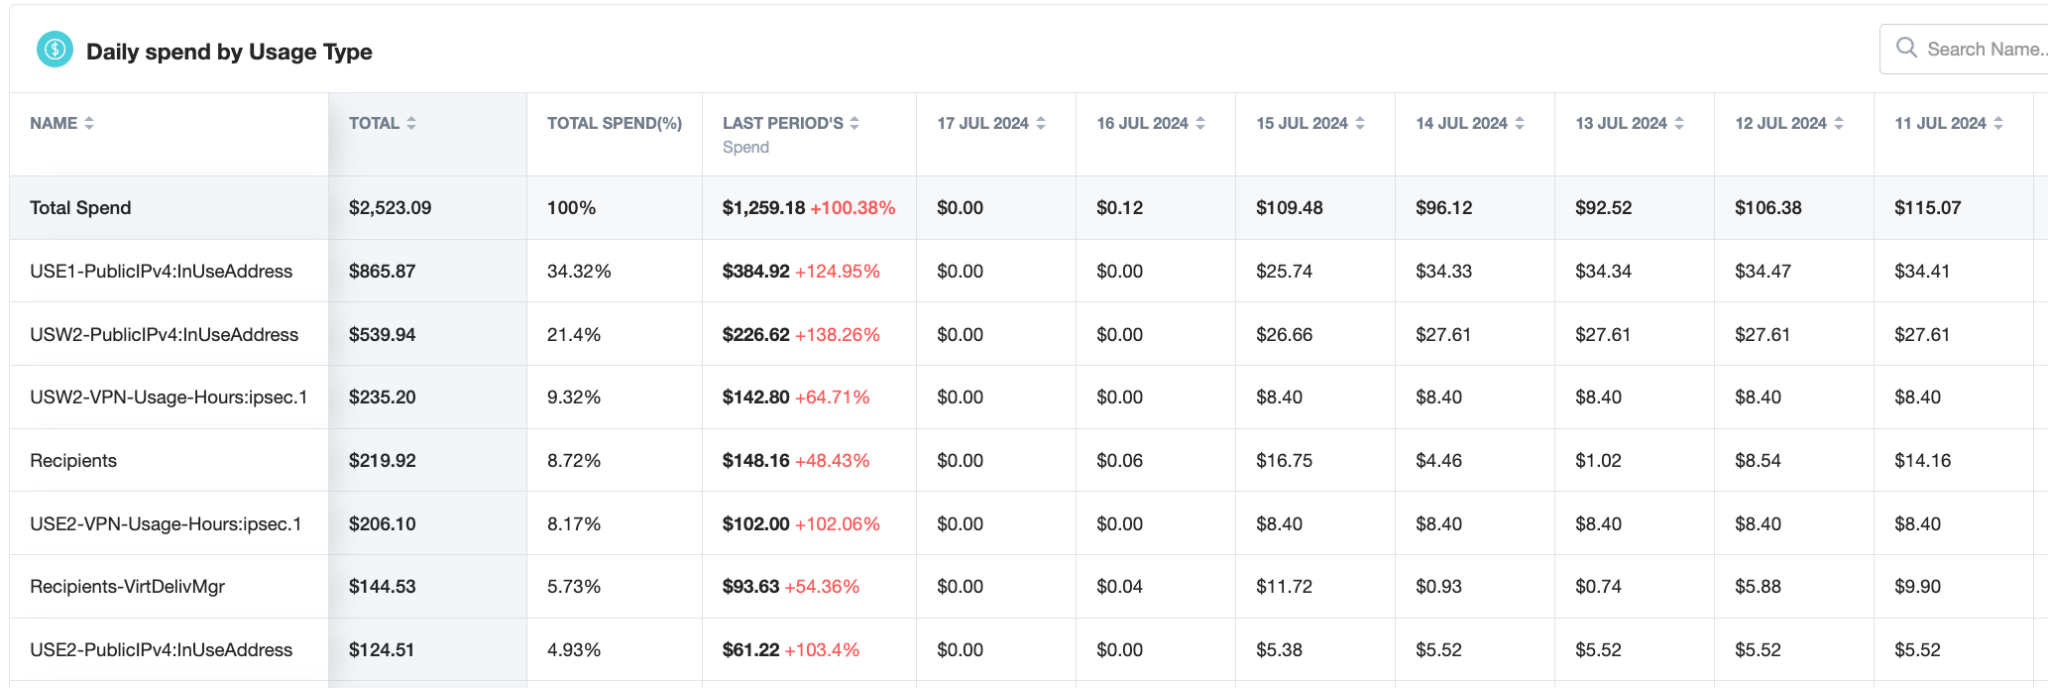
#4: Eliminate Idle IP addresses
As of February 2024, AWS has started charging for IPv4 addresses. The updated AWS Cost and Usage Report (CUR) now includes specific usage types for idle and in-use public IPv4 addresses to aid in cost estimation and management.
You can leverage tools like Public IP Insights within Amazon VPC IP Address Management and best practices such as disabling auto-assignment where unnecessary and utilizing services like NAT gateways or AWS Global Accelerator to lower your AWS bill.
To pick the low hanging fruit and release the idle unattached IP addresses just sitting there and costing you money, it’s really easy to find all of your idle IP addresses with a simple search in the nOps platform.
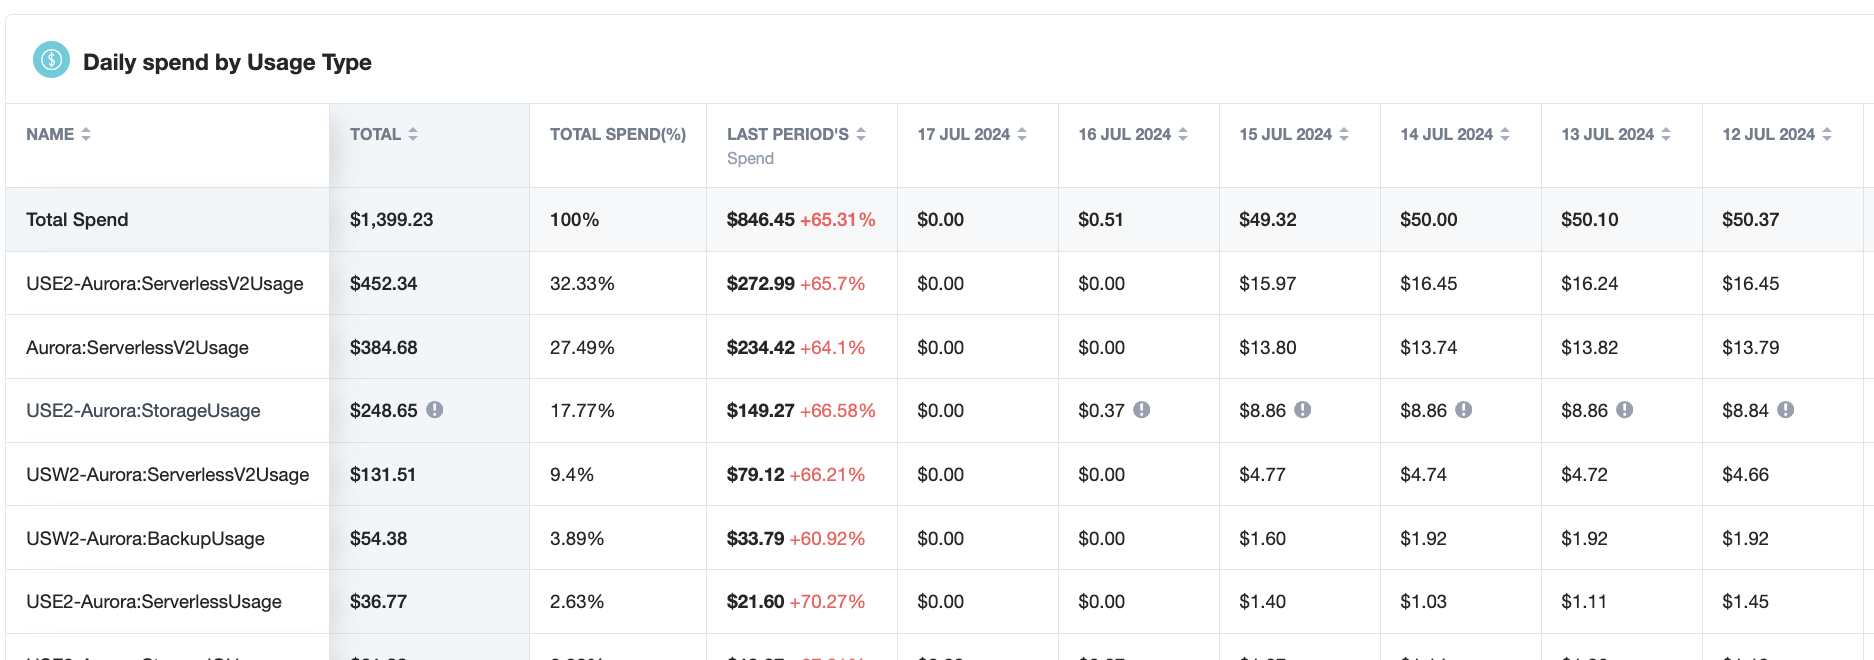
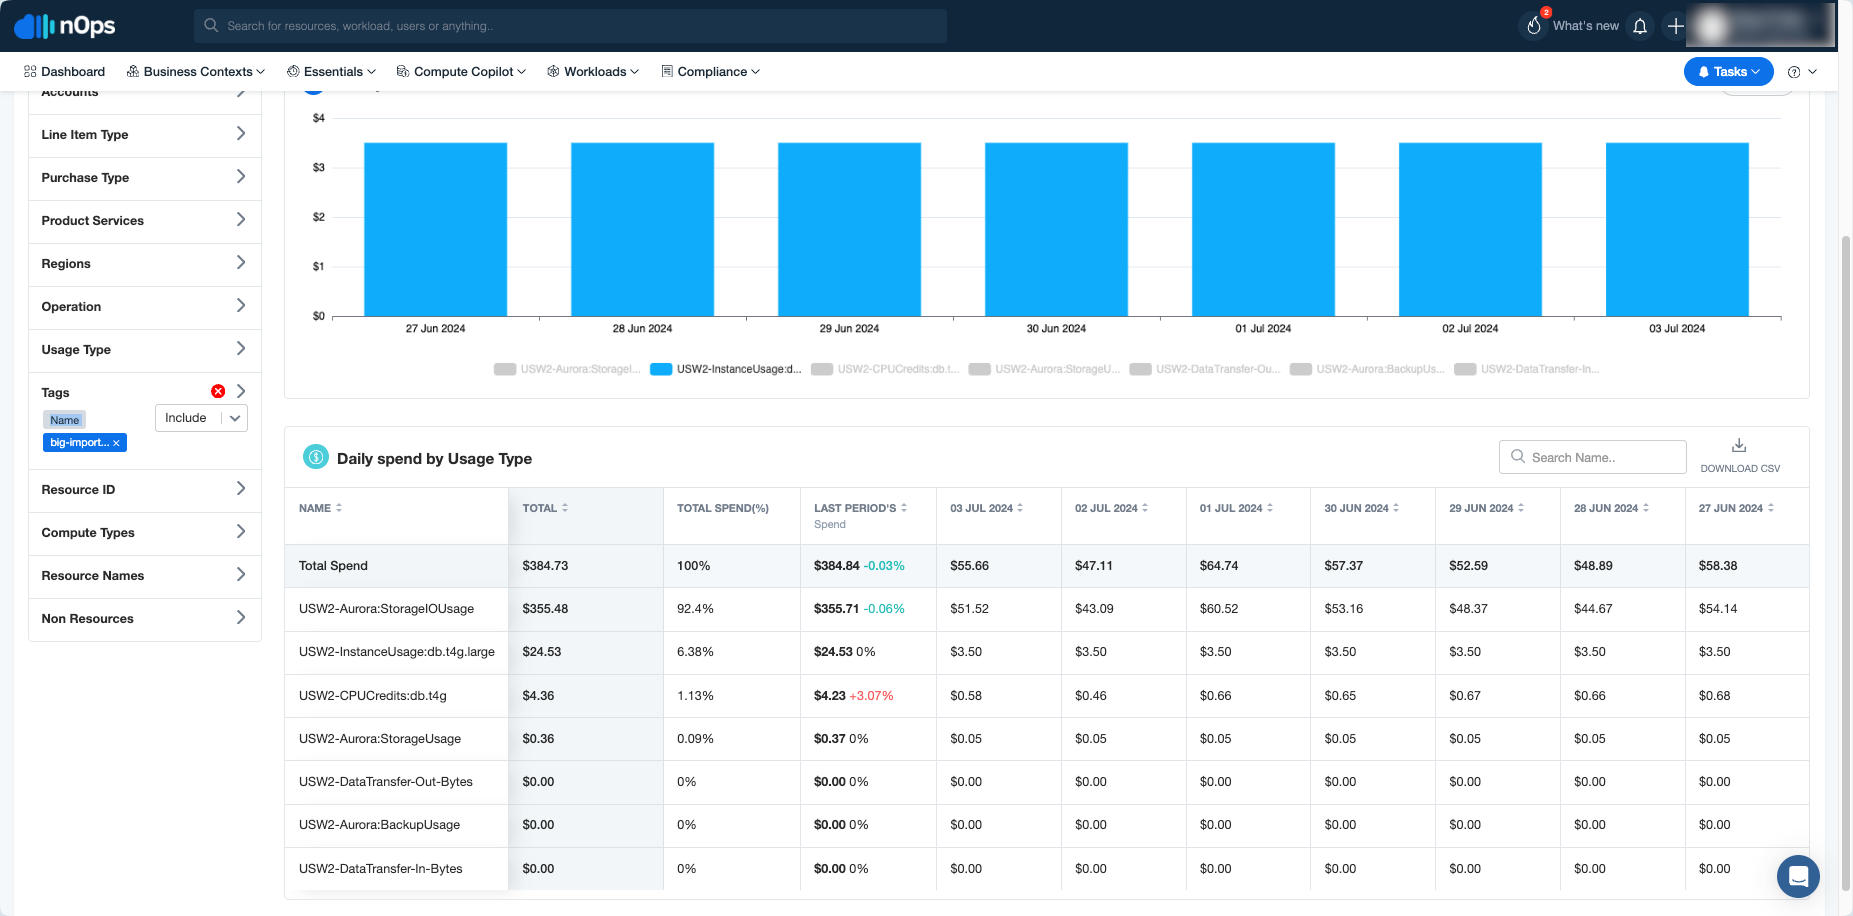
#5: Consider Aurora I/O Optimized
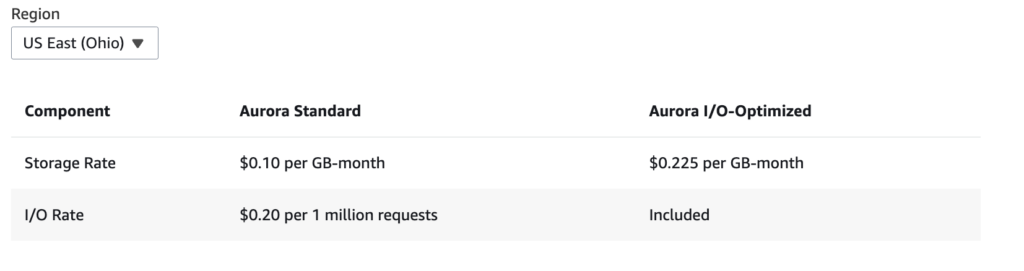
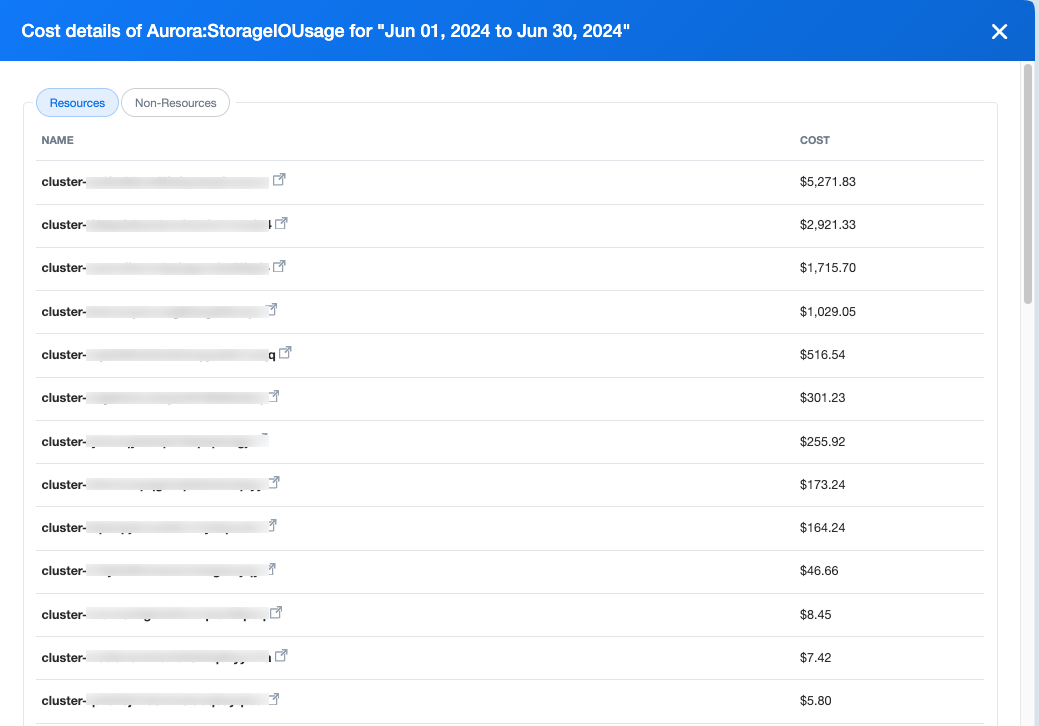
First, compare your current storage and I/O costs with Aurora Standard. Next, validate your actual I/O usage through CloudWatch or another monitoring tool.
Second, determine the instance type in use as I/O optimized instances cost 30% more than standard. In your RDS cluster information, find the instance type in use.
AWS Console:

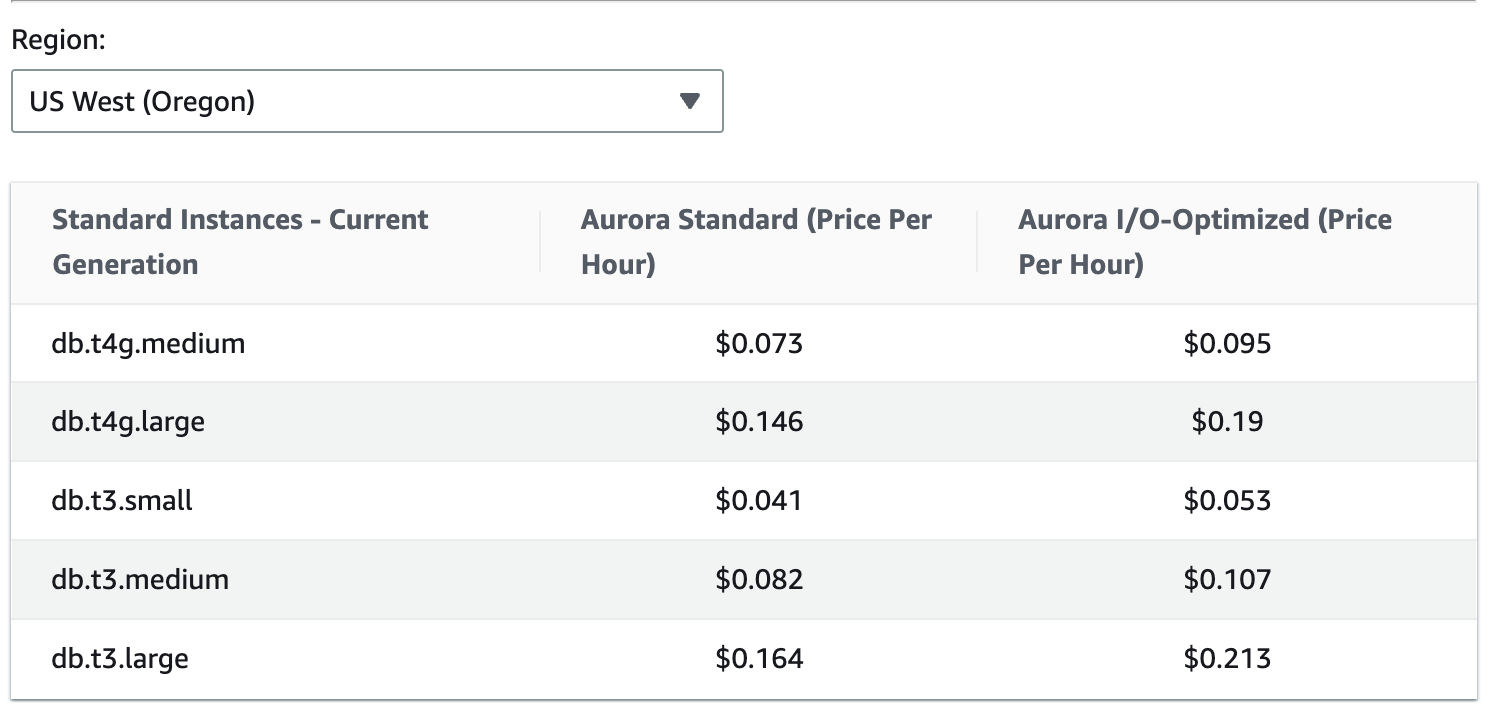
As you can see, on top of the storage costs being higher, so too are the compute costs.
A simple cost analysis of storage and I/O costs based on the table above will help you to determine if switching to Aurora I/O-Optimized or just reducing your provisioned I/O will reduce costs.
#6: Switch to DynamoDB provisioned capacity
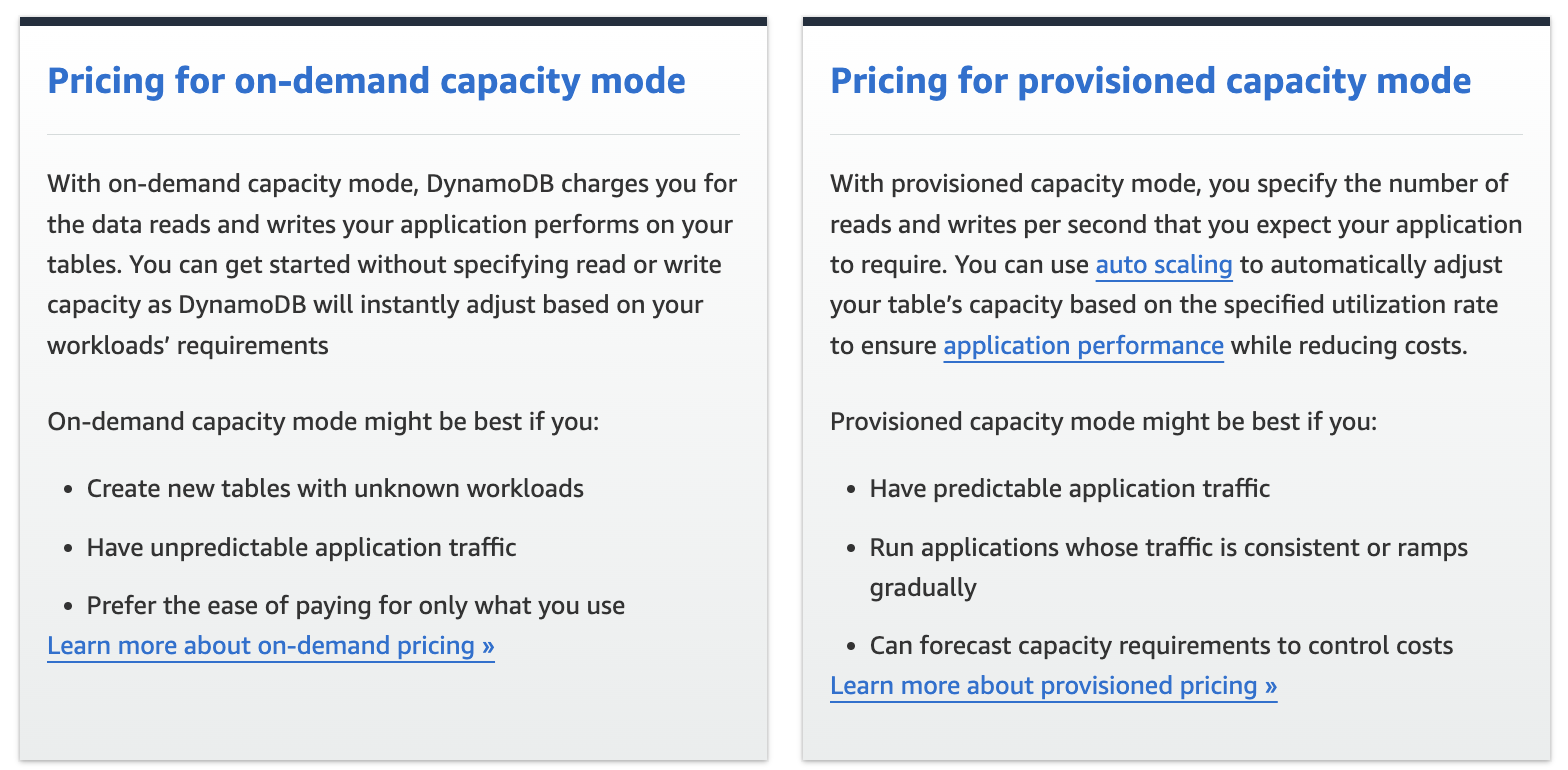
With provisioned capacity you pay for the provision of read and write capacity units for your DynamoDB tables. Whereas with DynamoDB on-demand you pay per request for the data reads and writes that your application performs on your tables.
With provisioned capacity mode, you specify the number of reads and writes per second that you expect your application to require, and you are billed based on that. If you can forecast your capacity requirements, this can help you save often around $50 per day.
The easiest way to find and eliminate hidden AWS costs
If you’re looking to save on AWS costs, nOps Business Contexts makes it easy and painless to understand your cloud spend.
Business Contexts transforms millions of rows of contextless data into the who, what, when and why of cloud spend — making it easy to get 100% visibility of your cloud costs and usage so your bills are never a surprise or mystery.
- Allocate 100% of your AWS costs, including EKS. Kubernetes costs are often a black box — no longer with nOps. Understand and allocate your unified AWS spend in one platform.
- Automated resource tagging. You don’t need to have all your resources tagged to allocate costs. Create dynamic rules by region, tags, operation, accounts, and usage types to allocate costs back to custom cost centers.
- 40+ views & filters. Map hourly costs by any relevant engineering concept (deployment, service, namespace, label, pod, container…) or finance concept (cost unit, purchase type, line item, cost allocation tag…).
- Custom reports & dashboards for the whole team. Monthly reporting and reconciliation can take hours; with nOps only minutes. Tailor dashboards and Slack/email reports to your needs, whether you’re a CFO or VP of Engineering.
The best part? nOps is an all-in-one solution for all of your cloud optimization needs: automated commitment management, rightsizing, resource scheduling, workload management, Spot usage, storage optimization, and more.
Join our customers using nOps to understand your cloud costs and leverage automation with complete confidence by booking a demo today!